Sample: JSFUnit
Content:
Introduction
Concept behind this application
Preparing for JSFUnit
Building JSFUnit
Version 1 - Sources
Version 1 - Preparation
Version 1 - Creating the projects
Version 1 - cleanup
Version 1 - pom.xml
Version 1 - First Test: creating deployable file
Version 1 - First Test: test code
Version 1 - First Test: run, Forrest, run!
Version 1 - Run the Test by using Maven
Version 1 - Run the Test by using the Eclipse JUnit framework
Version 2 - Sources
Version 2 - Creating the projects
Version 2 - pom.xml
Version 2 - First Test: creating deployable file
Version 2 - First Test: test code
Version 2 - First Test: run, Forrest, run!
Version 2 - Run the Test by using the Eclipse JUnit framework
Some hints
Troubleshooting
Introduction
This is a sample for a Unit test, which is used to unit test the JSF layer. As Maven and Eclipse are used to built the sample, this sample
is focused on using Eclipse to build a JSFUnit project.
This tutorial contains two versions of the sample: one is more Maven focused, and the other version tries to combine Maven based Unit tests and
the Eclipse Web Tools Platform.
The sample is built on top of my "JSF Basics" sample: JSF Basics (the page itself is in german, but the sample code is english).
This sample consists of one JSF page, where the user can input the side lengths of a cube, and a JSF Managed Bean calculates volume and surface
and also keeps a history of all calculations of the current session.
For unit testing the JSF layer, we use JSFUnit (http://www.jboss.org/jsfunit). JSFUnit provides JUnit style tests. JSFUnit uses the Arquillian framework
(http://www.jboss.org/arquillian),
which is a testing framework that provides "in-container" tests (deploy the app to the container, invoke the tests, undeploy it afterwards).
For more details about JSFUnit, see here: http://www.jboss.org/jsfunit/gettingstarted_version_2-0-0.html
For more details about Arquillian, see here:
http://docs.jboss.org/arquillian/reference/latest/en-US/html_single/
(e.g. chapter 3 - "Getting started").
Feel free to comment on this sample - as I am a Maven noob, I am happy about improvement suggestions. You might either post in the
JBoss forum, where I started a thread pointing to this sample, or you might send me an email:

Concept behind this application
To get the current JSFUnit (JSFUnit 2.0 Beta 2) binaries, you have to use Maven, because there is no separate download available.
There is a plugin for Eclipse, which brings Maven support. But the project structure of "mavenized" projects is quite different to the
project structure used by Eclipse and the Web Tools Platform plugin - thus to me it seems that two worlds are connected which do not smoothly fit.
So version 1 of my sample goes a Maven way and creates a Maven project, which is made compatible to the Web Tools Platform project structure by
an Eclipse plugin.
Version 2 is the result of my attempts to combine both worlds in a less strongly connected way: for the JavaEE layer, I use Eclipse without Maven.
The unit tests reside in a separate project, and they use Maven to resolve the dependent libraries and to run the tests.
This works quite well, there was only one problem to resolve, because the Arquillian testrunner needs to find class files from the non-maven projects.
But with some workarounds, this problem can also be solved.
Preparing for JSFUnit
Step 1: Install the Eclipse Maven plugin "M2Eclipse" (http://eclipse.org/m2e/):
use this Update Site: http://download.eclipse.org/technology/m2e/releases/
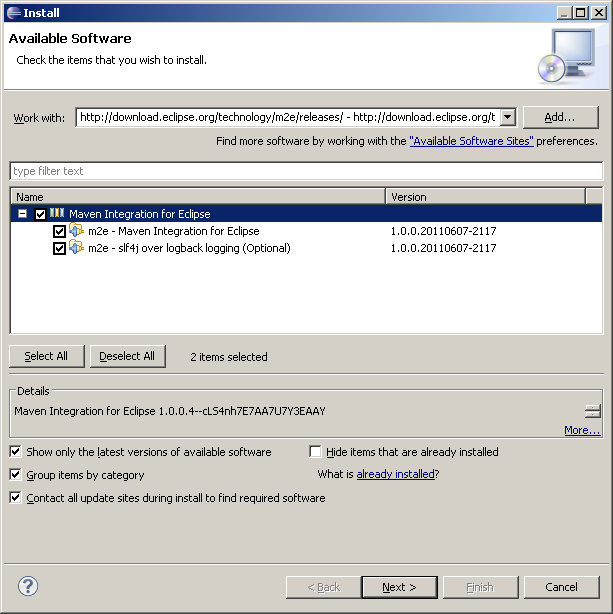
After completion of the installation, a warning might pop up that a JDK is required:
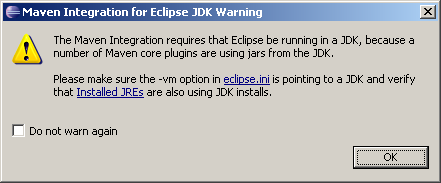
If this warning is shown, open "Eclipse.ini" and add an argument "-vm" (see http://wiki.eclipse.org/Eclipse.ini).
Here is the full file found in my installation (DON'T copy the full content to your Eclipse installation, just add the "-vm" switch - your eclipse.ini might differ
in some parts):
-startup
plugins/org.eclipse.equinox.launcher_1.2.0.v20110502.jar
--launcher.library
plugins/org.eclipse.equinox.launcher.win32.win32.x86_1.1.100.v20110502
-showsplash
org.eclipse.platform
--launcher.XXMaxPermSize
256m
--launcher.defaultAction
openFile
-vm
C:/Program Files (x86)/Java/jdk1.6.0_26/bin/javaw.exe
-vmargs
-Xms40m
-Xmx384m
M2Eclipse will now start downloading the Index of the central Maven repository (in the moment about 70MB):

Same information can be found in the "Progress" view:

Note: you can switch to the Maven console later by clicking the "Open Console" button in the "Console" view:

The index file will be downloaded to "%USER_HOME%\.m2\repository\.cache\m2e\1.0.0". Every day, an incremental update to this file
will be downloaded when starting Eclipse.
Caution:
While M2Eclipse is downloading files, you should never exit Eclipse. If you do so, this might result in broken files in the local Maven repository.
Step 2: Download Maven: http://maven.apache.org/ and extract it to any location on your computer.
I used 3.0.3 for this sample.
Building JSFUnit
At the moment when this doc is written, there is no release of JSFUnit 2.0 Beta 2, so you have to build it yourself. Follow this guide:
http://community.jboss.org/wiki/JSFUnit200GettingStartedExample
After having checked out the sources from SVN (I use TortoiseSVN for this: http://tortoisesvn.tigris.org/),
we first have to build JSFUnit and place it in our local repository. To do so, we use this command line:
%MAVEN_HOME%\bin\mvn.bat install
This command will run not tests, just install the libs.
To get started with JSFUnit, the first step would be to take a look at the "Getting Started" sample - found in the JSFUnit sources.
First start your local JBoss 6, then run the sample with this Maven command:
%MAVEN_HOME%\bin\mvn.bat test -Pjbossas-remote-6
In the moment, this will raise errors. Reason: the "pom.xml" in current SVN references a repository which was removed recently:
http://community.jboss.org/en/build/blog/2011/06/01/blocking-repositoryjbossorgmaven2
Modifiy the repository list in "gettingstarted\pom.xml" this way:
 <repositories>
    <repository>
      <id>jboss-public-repository-group</id>
      <name>JBoss Public Maven Repository Group</name>
      <url>https://repository.jboss.org/nexus/content/groups/public</url>
      <layout>default</layout>
      <releases>
        <enabled>true</enabled>
        <updatePolicy>never</updatePolicy>
      </releases>
      <snapshots>
        <enabled>true</enabled>
        <updatePolicy>never</updatePolicy>
      </snapshots>
    </repository>
    <repository>
      <id>repository.jboss.org</id>
      <url>http://repository.jboss.org/maven2</url>
      <releases>
      </releases>
      <snapshots>
        <enabled>false</enabled>
      </snapshots>
    </repository>

    <repository>
      <id>jboss-deprecated-repository-group</id>
      <name>JBoss Deprecated Maven Repository Group</name>
      <url>https://repository.jboss.org/nexus/content/repositories/deprecated/</url>
      <releases>
        <enabled>true</enabled>
        <updatePolicy>never</updatePolicy>
      </releases>
      <snapshots>
        <enabled>true</enabled>
        <updatePolicy>never</updatePolicy>
      </snapshots>
    </repository>

  </repositories>
- Remove the repository URL "http://repository.jboss.org/maven2".
- The "deprecated" repository is required, because some JBoss module references a wrong version of "Trove", and this wrong version can be found only in
this repository: http://community.jboss.org/wiki/JBossDeprecatedRepository.
Version 1 - Sources
To run this sample, you need JSF.zip - this is the full project containing the unit test. Unzip it to your workspace, then import as "General" =>
"Existing Projects into Workspace".
Probably, you will have to change some config bits. E.g. in the Facets configuration, you might have to remove and add the JSF 2.0 Facet
and choose your correct library.
Version 1 - Preparation
"M2Eclipse" does a good job when handling standard Java projects. But it does not know the JavaEE project types of the Web Tools Platform plugin.
So we need another plugin to handle this. I used "m2e(clipse)-wtp" from the JBoss Tools platform. I did not find a "real" project homepage, but seems
seems to be the neariest "thing": https://issues.sonatype.org/browse/MECLIPSEWTP
And this is a link to a blog post about the (currently) most recent version 0.13.1:
http://community.jboss.org/en/tools/blog/2011/08/01/m2eclipse-wtp-0131-back-to-the-m2e-marketplace
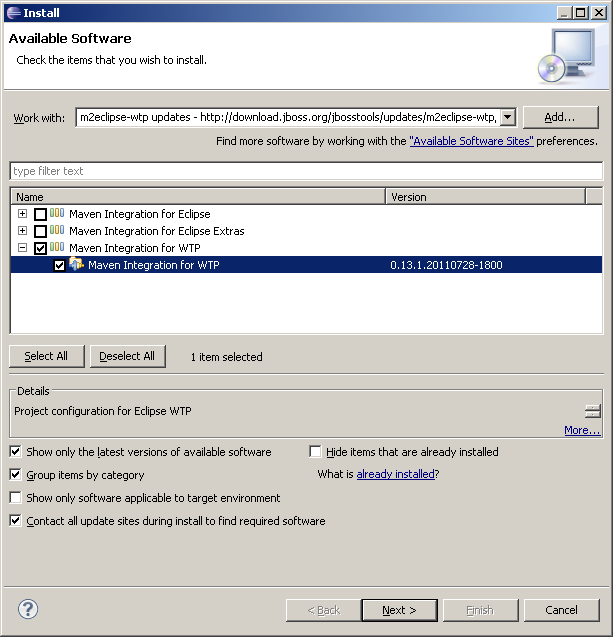
The update site for this plugin is: http://download.jboss.org/jbosstools/updates/m2eclipse-wtp/
Now install this plugin (you will find three plugins on this update site, but only install "Maven Integration for WTP"):
Version 1 - Creating the projects
This is the first difference to the projects used by the Web Tools Platform: we create a "Maven Project":
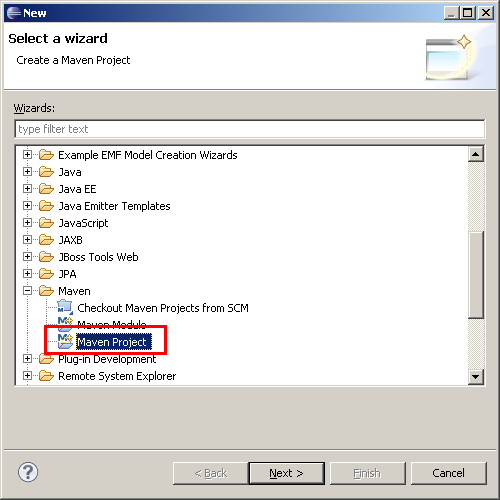
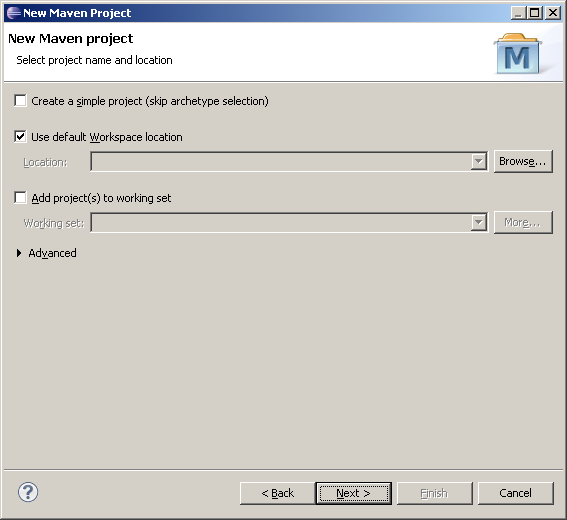
Step 1 of the wizard uses default settings:
Step 2 is more interesting: we need an archetype for a JavaEE6 web project. Here I use the archetype "jboss-javaee6-webapp":
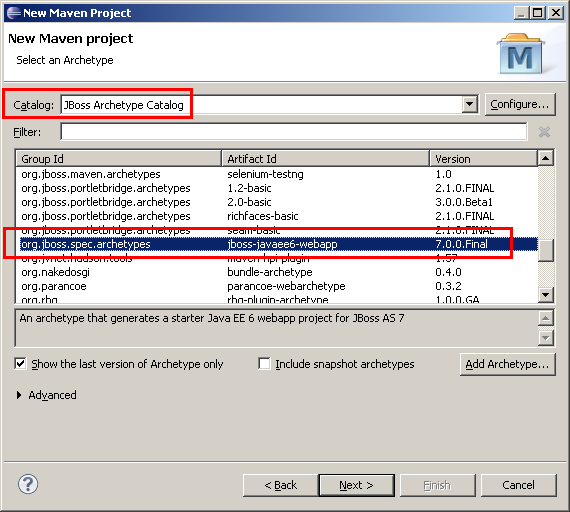
Note that this archetype is found in a JBoss specific catalog. When first using the archetype, you have to add it first.
Use this URL:
https://repository.jboss.org/nexus/content/groups/public/archetype-catalog.xml
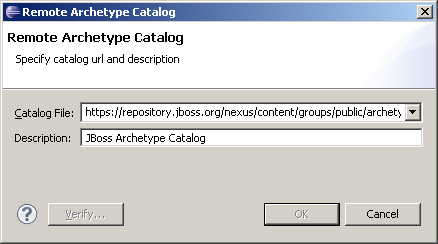
(more information about this archetype can be found here: https://docs.jboss.org/author/display/AS7/Creating+your+own+application )
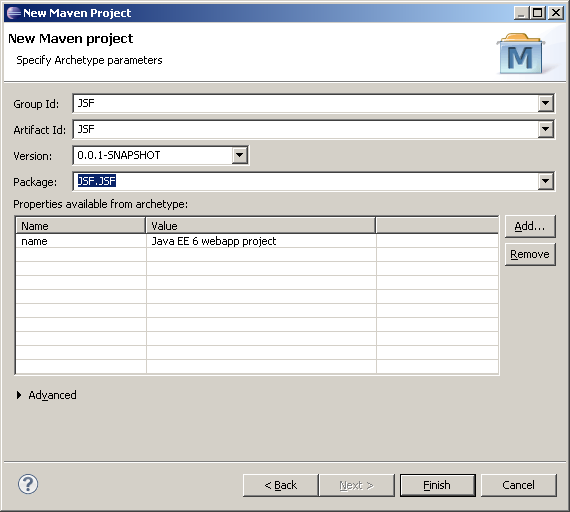
The final step is to add some meta information about the project (the Ids in the screenshot can probably be set to better values ;-)):
Now it is the time of the "M2E-WTP" plugin, which adds the required facets of a Dynamic Web Project:
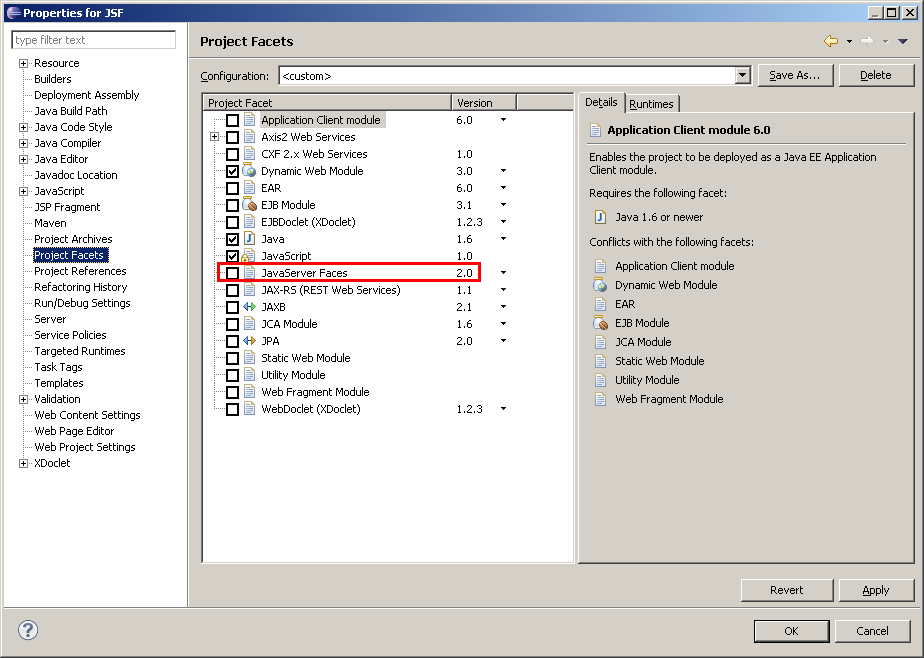
The only step left to you is to add the "JSF 2.0" facet (marked in the screenshot)
Version 1 - cleanup
Now we see a new project:
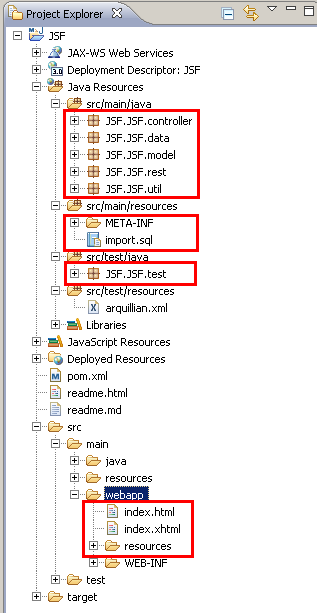
But the archetype introduced a whole bunch of files we don't need, and unfortunately it's dependencies point to JBoss 7. So, we start some cleanup;-).
- Delete all the files which are marked in the screenshot:
- All sources in "src\main\java"
- All sources in "src\test\java"
- All files in "src\main\resources" ("import.sql" and the META-INF subdir)
- "src\main\web-app\index.html" and "index.xhtml", also the whole "resources" subdir
- Open "test\resources\arquillian.xml" and remove the "container" element - it points to AS 7. Actually, you might also delete it, as
it is empty after cleanup. More details about this file to be done ;-)...
- The necessary changes to "pom.xml" are described in the next chapter.
Version 1 - pom.xml
Now we are updating "pom.xml" to match our goals: we change the server dependencies from JBoss 7 to JBoss 6, and we add
the configuration required for JSFUnit.
Step 0: general settings
There is this line:
   <properties>
      <!-- Explicitly declaring the source encoding eliminates the following
         message: -->
      <!-- [WARNING] Using platform encoding (UTF-8 actually) to copy filtered
         resources, i.e. build is platform dependent! -->
      <project.build.sourceEncoding>UTF-8</project.build.sourceEncoding>
As the comment explains, this might remove a Maven warning. But I found that this default "UTF-8" did not match my own project settings on a windows machine,
where the project default encoding is "Cp1252":
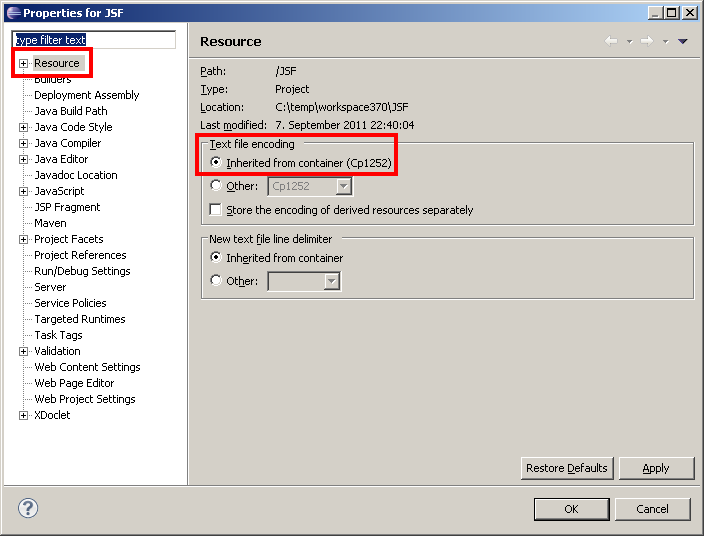
Here, a Maven build resulted in those errors:
[ERROR] Failed to execute goal org.apache.maven.plugins:maven-compiler-plugin:2.3.2:compile (default-compile) on project JSF: Compilation failure: Compilation failure:
[ERROR] \temp\workspace370\JSF\src\main\java\de\fhw\komponentenarchitekturen\knauf\jsf\GeometricModelHandler.java:[3,22] unmappable character for encoding UTF-8
So, either remove the "project.build.sourceEncoding" property in pom.xml, or (better) set the Eclipse project properties to UTF-8. In own sample, I
removed the property - might have been a bad idea ;-).
Step 1: Java version
The archetype has already done a good job by declaring Java version 1.6. See "build" - "plugins" for the declaration of "maven-compiler-plugin".
So nothing has to be changed in "pom.xml".
But if Eclipse found a JRE and used it by default (see the warning message above), you should now create a JDK configuration: in "Preferences" => "Java"
=> "Installed JREs" add a new one which points to a JDK:
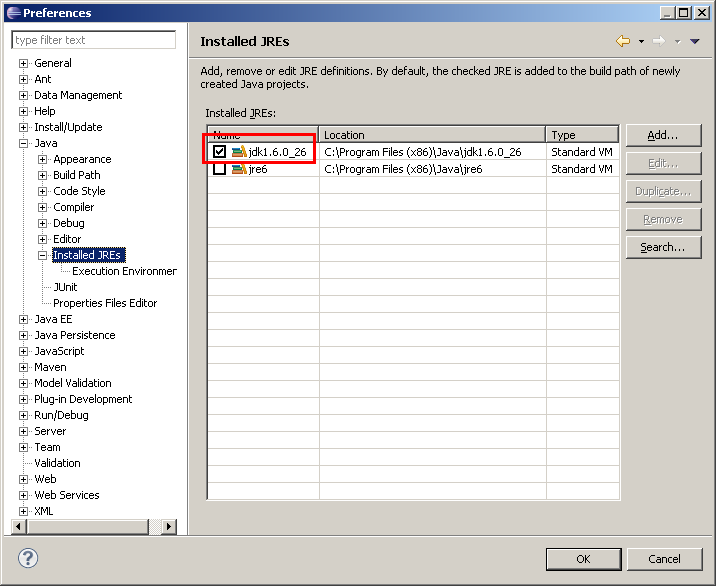
And in "Preferences" => "Java" => "Installed JREs" => "Excecution Environments", select "JavaSE-1.6" and check the JDK instead of the JRE:
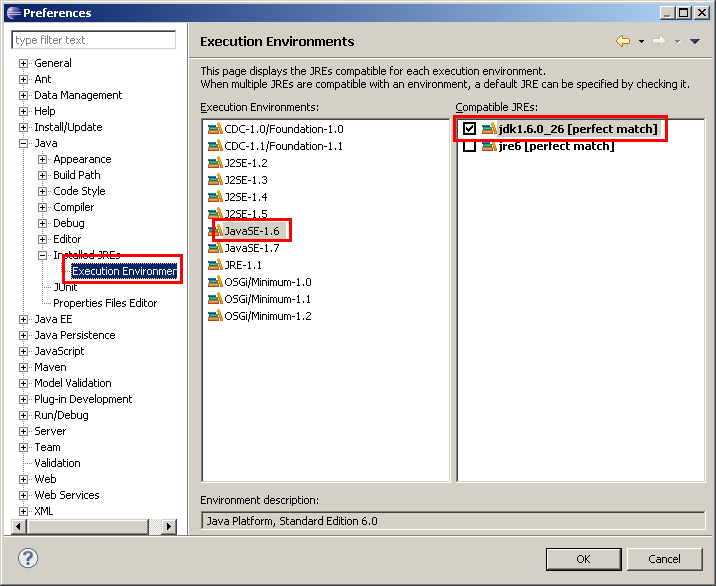
The project will reference the new JDK now.
Step 2: Repositories
Now we add some JBoss repositories. The following list is taken from the "gettingstarted" example (see above).
For more information about JBoss repositories, see here: http://community.jboss.org/wiki/MavenGettingStarted-Users
	<repositories>
		<repository>
			<id>jboss-public-repository-group</id>
			<name>JBoss Public Maven Repository Group</name>
			<url>https://repository.jboss.org/nexus/content/groups/public</url>
			<layout>default</layout>
			<releases>
				<enabled>true</enabled>
				<updatePolicy>never</updatePolicy>
			</releases>
			<snapshots>
				<enabled>true</enabled>
				<updatePolicy>never</updatePolicy>
			</snapshots>
		</repository>
		<!-- Deprecated Repository -->
		<repository>
			<id>jboss-deprecated-repository-group</id>
			<name>JBoss Deprecated Maven Repository Group</name>
			<url>https://repository.jboss.org/nexus/content/repositories/deprecated/</url>
			<releases>
				<enabled>true</enabled>
				<updatePolicy>never</updatePolicy>
			</releases>
			<snapshots>
				<enabled>true</enabled>
				<updatePolicy>never</updatePolicy>
			</snapshots>
		</repository>
	</repositories>
	<pluginRepositories>
		<pluginRepository>
			<id>jboss-public-repository-group</id>
			<name>JBoss Public Maven Repository Group</name>
			<url>https://repository.jboss.org/nexus/content/repositories/releases/</url>
			<layout>default</layout>
			<releases>
				<enabled>true</enabled>
				<updatePolicy>never</updatePolicy>
			</releases>
			<snapshots>
				<enabled>false</enabled>
				<updatePolicy>never</updatePolicy>
			</snapshots>
		</pluginRepository>
	</pluginRepositories>
Step 3: Dependencies and Profile
We now have to declare the dependencies for JSFUnit.
First part is the JSFUnit-Framework:
	<properties>
		<version.jsfunit>2.0.0-SNAPSHOT</version.jsfunit>
		<version.arquillian>1.0.0.Alpha5</version.arquillian>
	</properties>

	...

	<dependencies>
		<dependency>
			<groupId>javax.enterprise</groupId>
			<artifactId>cdi-api</artifactId>
			<version>1.0-SP1</version>
			<scope>provided</scope>
		</dependency>

		<dependency>
			<groupId>junit</groupId>
			<artifactId>junit</artifactId>
			<version>4.8.1</version>
			<scope>test</scope>
		</dependency>

		<dependency>
			<groupId>org.jboss.arquillian</groupId>
			<artifactId>arquillian-junit</artifactId>
			<version>${version.arquillian}</version>
			<scope>test</scope>
		</dependency>

		<dependency>
			<groupId>com.sun.faces</groupId>
			<artifactId>jsf-api</artifactId>
			<version>2.0.4-b03</version>
			<scope>provided</scope>
		</dependency>

		<dependency>
			<groupId>jboss.web</groupId>
			<artifactId>servlet-api</artifactId>
			<version>3.0.0-beta-2</version>
			<scope>provided</scope>
		</dependency>


		<dependency>
			<groupId>org.jboss.jsfunit</groupId>
			<artifactId>jsfunit-arquillian</artifactId>
			<version>${version.jsfunit}</version>
			<scope>test</scope>
		</dependency>


		<!-- JSTL.jar: -->
		<dependency>
			<groupId>javax.servlet</groupId>
			<artifactId>jstl</artifactId>
			<version>1.2</version>
		</dependency>

	</dependencies>
Note that the versions of JSFUnit and Arquillian are declared as properties, so that an update is easily possible.
We have an additional dependency here compared to version 2 of my sample: as we don't use the local JBoss jar files, we have to
add a reference to "jstl.jar" also. See http://mvnrepository.com/artifact/javax.servlet/jstl/1.2 for the necessary IDs.
After saving the file, the dependencies are refreshed and you should see them in "Project Explorer". The path after each entry is the path in
your local Maven repository:
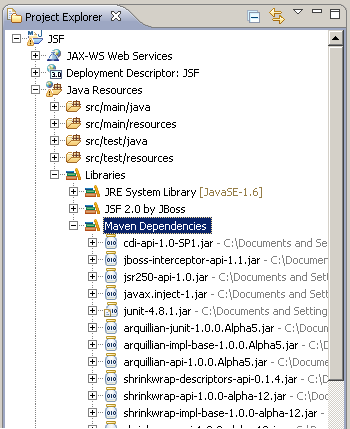
The GUI editor for "pom.xml" provides the ability to browse a repository for available artifacts. But this does not work for the JBoss repos -
probably because they don't provide a "Nexus index" file.
Next we add a "Profile": when you want to run your tests against multiple containers, you need a profile for each container, which bundles the container
specific dependencies. You also need a profile when running just a single container, because Arquillian will fail otherwise.
First remove all the profiles generated by the archetype. Then add this one:
	<profiles>

		<profile>
			<id>arq-jbossas-remote</id>
			<dependencies>
				<dependency>
					<groupId>org.jboss.arquillian.container</groupId>
					<artifactId>arquillian-jbossas-remote-6</artifactId>
					<version>${version.arquillian}</version>
					<scope>test</scope>
				</dependency>

				<dependency>
					<groupId>org.jboss.jbossas</groupId>
					<artifactId>jboss-as-profileservice-client</artifactId>
					<version>6.0.0.Final</version>
					<type>pom</type>
					<scope>test</scope>
				</dependency>
				<!-- jboss-deployers-client-spi provides deployment exception class -->
				<dependency>
					<groupId>org.jboss.deployers</groupId>
					<artifactId>jboss-deployers-client-spi</artifactId>
					<version>2.2.0.GA</version>
					<scope>test</scope>
				</dependency>
			</dependencies>
		</profile>
	</profiles>
Note that some dependencies differ from the "Getting Started" sample. The reason is this page:
http://community.jboss.org/en/arquillian/blog/2011/04/05/trim-your-dependencies-when-using-jboss-as-6-remote.
According to a comment on this page, "jboss-as-profileservice-client" is not the only requirement, also "jboss-deployers-client-spi" is required.
That's all, now we are ready to code our first test ;-).
Version 1 - First Test: creating deployable file
Now, we add the test class "de.fhw.komponentenarchitekturen.knauf.jsf.tests.GeometricModelTest" in the source directory "src\test\java" (NOT in "src\main\java").
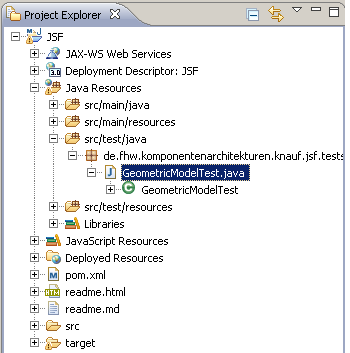
The class header will look like this:
@RunWith(Arquillian.class)
public class GeometricModelTest
{
  ...
First step in this test is to create a deployable archive which basically has the same content as a WAR file which would be deployed by Eclipse.
The Arquillian framework will deploy this archive to a remote (local running) JBoss.
So we add a static method "createDeployment" and annotate it with @org.jboss.arquillian.api.Deployment:
  @Deployment
  public static WebArchive createDeployment()
  {
    WebArchive war = ShrinkWrap.create(WebArchive.class, "JSF.war");

    war.setWebXML(new File("src/main/webapp/WEB-INF/web.xml"));

    war.addClasses(GeometricModelHandler.class, Historie.class, Seitenlaengen.class, GeometricModelTest.class);

    war.addAsWebResource(new File("src/main/webapp/index.jsp"));
    war.addAsWebResource(new File("src/main/webapp/geometricmodel.jsp"));

    war.addAsWebInfResource(new File("src/main/webapp/WEB-INF//faces-config.xml"), "faces-config.xml");

    // Required for CDI Injection...
    war.addAsWebInfResource(EmptyAsset.INSTANCE, "beans.xml");

    //Find "jstl.jar" in your local maven repostory!
    File[] jars = DependencyResolvers.use(MavenDependencyResolver.class).artifact("javax.servlet:jstl:1.2").resolveAsFiles();
    war.addAsLibraries (jars);

    System.out.println("JSF.GeometricModelTest.createDeployment");

    System.out.println(war.toString(true));

    return war;
  }
We create a "WebArchive", using the "ShrinkWrap" API. Note that the war file name defines the default context root (if no different context root is declared),
so it must be identical to the name which is used to access the app later.
- "web.xml" is put in the archive by using the method "setWebXML".
- All class files are added by using "addPackage" or "addClass". In my sample I add the package "de.fhw.komponentenarchitekturen.knauf.jsf": this
contains the classes from my "JSF" project, and also the classes in the subpackage ".tests".
But error detection for missing classes will be easier if you don't add a full package, but single classes:
war.addClasses(GeometricModelHandler.class, Historie.class, Seitenlaengen.class, GeometricModelTest.class);
This way, you will see an error message when you take some classes from a different project and this project reference is lost.
- All JSP files are added by using "addAsWebResource"
- "faces-config.xml" must be added using "addAsWebInfResource": this method adds files to "WEB-INF".
- An empty "beans.xml" is added - as far as I know this is required for CDI ("Context and Dependency Injection"). The snippet is taken from the "Getting Started"
sample, I don't know in how far it is required. For more details see here:
http://community.jboss.org/wiki/InjectionCDIForJSFSessionJSFClientSessionAndJSFServerSession
- "jstl.jar" can be found in our local repository. To add it to WEB-INF/lib, we have to do a repository lookup.
We achieve this with the help of
org.jboss.shrinkwrap.resolver.api.DependencyResolvers, using the resolver org.jboss.shrinkwrap.resolver.api.maven.MavenDependencyResolver.
A lookup for "groupId:artifactId:version" is performed, and the return value is resolved to a java.io.File array.
This array is added to the archive by using "addAsLibraries".
- For debugging purposes, a "war.toString(true)" is very helpful - it outputs a full list of all files in the archive.
Version 1 - First Test: test code
Now it is time for the test: the JSF sample app contains a form with three input fields. After clicking a submit button, the input page is re-shown,
and two more labels show the results.
The test method looks like this:
  @Test
  @InitialPage("/geometricmodel.faces")
  public void testGeometricModel(JSFServerSession server, JSFClientSession client)
    throws IOException
  {
      // Test navigation to initial viewID
      Assert.assertEquals("/geometricmodel.jsp", server.getCurrentViewID());

      //Set data to form:
      client.setValue("formGeometricModelInput:a", "1");
      client.setValue("formGeometricModelInput:b", "2");
      client.setValue("formGeometricModelInput:c", "3");

      //Submit form:
      client.click("formGeometricModelInput:calculate");

      //The new page should also be "geometricmodel.jsp":
      Assert.assertEquals("/geometricmodel.jsp", server.getCurrentViewID());

      //Get results and assert they have the expected values:
      Double volume = (Double) server.getComponentValue("formGeometricModelInput:volume");
      Double surface = (Double) server.getComponentValue("formGeometricModelInput:surface");
      System.out.println ("Volume: " + volume + ", Surface: " + surface);

      Assert.assertEquals(6.0, volume.doubleValue(), 0.0);
      Assert.assertEquals(22.0, surface.doubleValue(), 0.0);
  }
The code in detail:
Now we are nearly ready to execute the text. Before doing so, there is one step of configuration left:
In the project properties, enter the "Maven" group and enter the profile name you declared in "pom.xml":
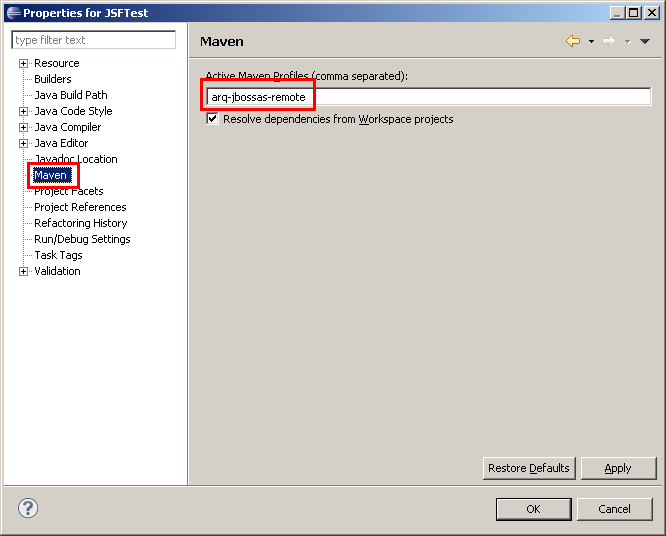
Version 1 - First Test: run, Forrest, run!
So let's start our test: in the "Run as" contextmenu of the project, select "Maven test":
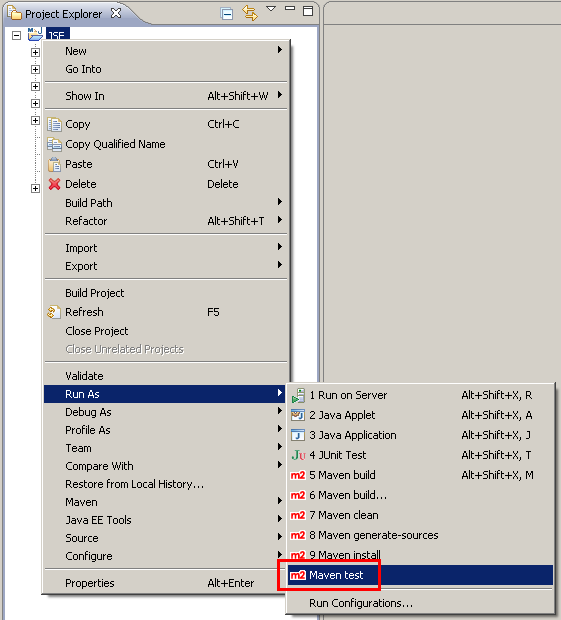
Now you will see the output of the test in a "Maven console" window. If everything works fine, you will also see server output: the war file "JSF.war" will
be deployed, and all "System.out.println" in the test will be output on the server console.
Test results (or exceptions) can be found here:
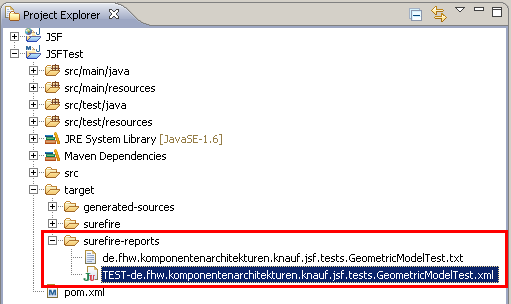
The "txt" file is the human readable part, the "xml" file can be used to show results in the "JUnit results" view.
Version 1 - Run the Test by using Maven
You can also run the tests by using Maven directly (without "M2Eclipse"). Here is the content of a batch file:
set JAVA_HOME=C:\Program Files (x86)\Java\jdk1.6.0_26
set JBOSS_HOME=C:\temp\jboss-6.0.0.Final

C:\temp\apache-maven-3.0.3\bin\mvn.bat test -Parq-jbossas-remote
The "test" parameter tells Maven to execute tests, and "-P" denotes a profile (see above).
The results will also be placed in a directory "target\surefire-reports" in the project directory. Remember to "Refresh" the project for seing
the changed files in Eclipse.
Version 1 - Run the Test by using the Eclipse JUnit framework
Using the Eclipse JUnit framework is simple: select the project, contextmenu "Run as" => "JUnit test":
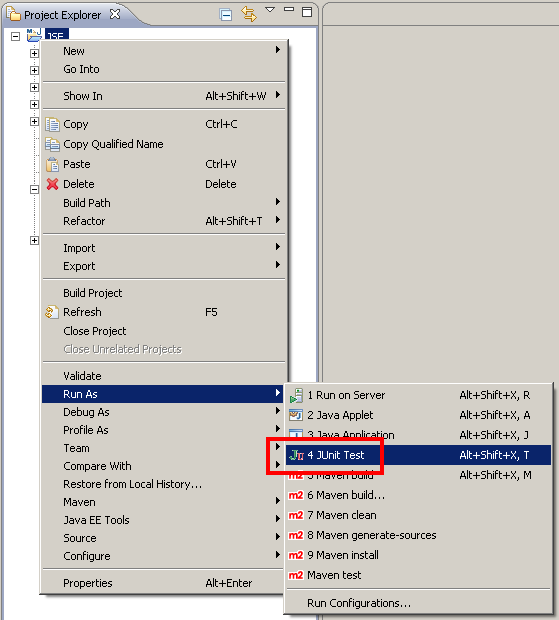
Now the tests will run, and we will see the results in the "JUnit" view:

You can also debug your tests this way.
Version 2 - Sources
To run this sample, you need:
- JSF.war - import it in Eclipse as "Dynamic Web Project"
- JSFTest.zip - this is the full project containing the unit test. Unzip it to your workspace, then import as "General" =>
"Existing Projects into Workspace"
Version 2 - Creating the projects
Step 1 is to import the WAR file containing the app to be tested: JSF.war
Import it by calling Menu "File" => "Import" => "Web/WAR File".
Step 2 is to create the unit test project. In Menu "File" => "New" => "Other" choose "Maven" => "Maven Module":
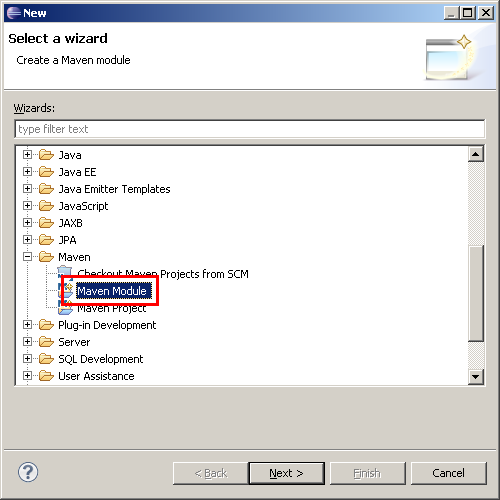
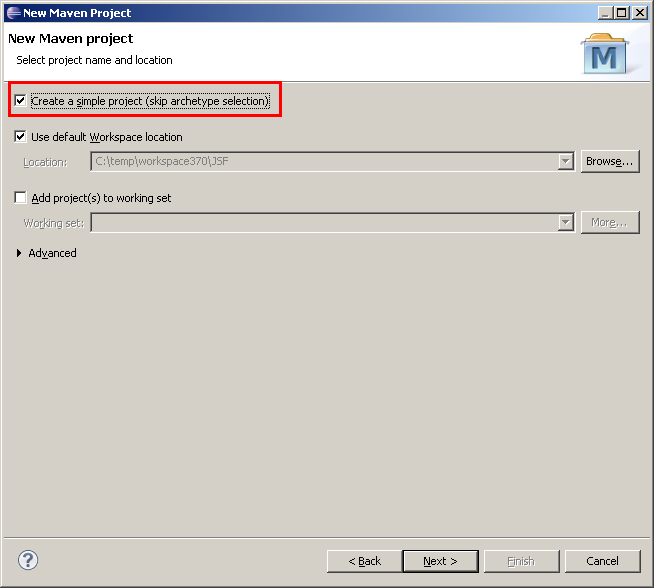
In the next step, we switch off "Archetype selection", because we will create a simple project:
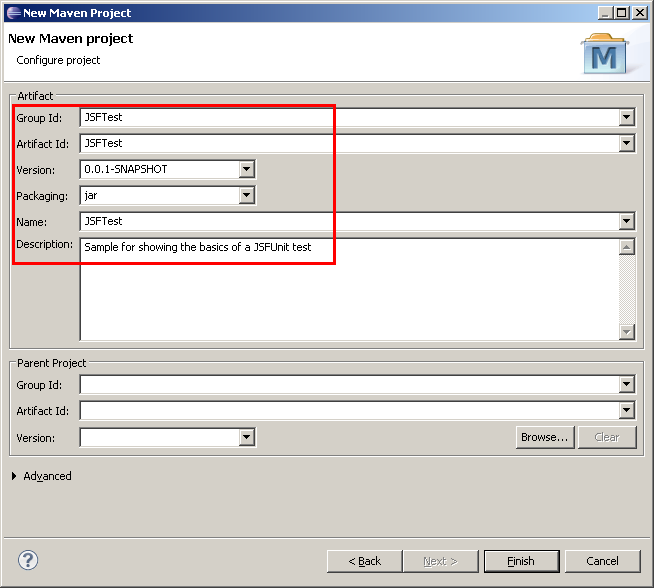
In step 3, we enter some core data for the project (can later all be modified by editing "pom.xml"):
Now the project will be created, this might take some seconds.
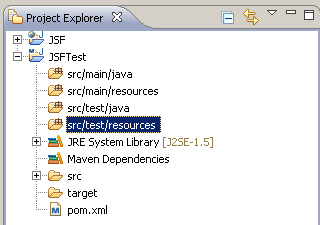
The result will look like this in "Project Explorer" (note, that the Java version is still "1.5" - we will take care for this later):
Version 2 - pom.xml
We now prepare "pom.xml" for our project. When double clicking it, there is a rich GUI editor for it. But for this sample, simply switch to the
"pom.xml" tab of the editor and copy/paste the content from my page. You might see the results in the editor and thus see where to input the data
in the GUI editor.
Step 1: Java 1.6
We want to use Java 1.6, so we change the version. Add this to your pom.xml:
	<build>
		<plugins>

			<plugin>
				<groupId>org.apache.maven.plugins</groupId>
				<artifactId>maven-compiler-plugin</artifactId>
				<version>2.3.2</version>
				<configuration>
					<source>1.6</source>
					<target>1.6</target>
				</configuration>
			</plugin>
		</plugins>
	</build>
In my previous attempts with Eclipse 3.6. and M2Eclipse 0.12.1, saving the pom.xml updated the project configuration automatically. But
with Eclipse 3.7 and M2Eclipse 1.0.0., I just saw an error marker "Project configuration is not up-to-date with pom.xml. Run project configuration update":

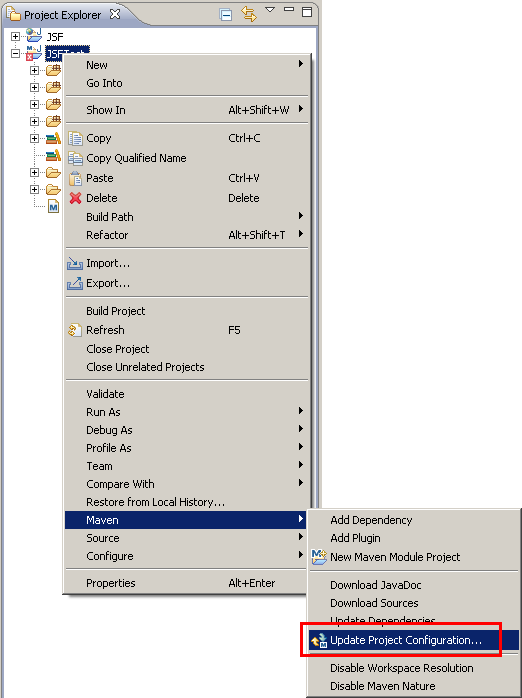
So right click the project, and in the context menu, select "Maven" => "Update Project Configuration...":
This will bring up this dialog. Leave all settings to their defaults:
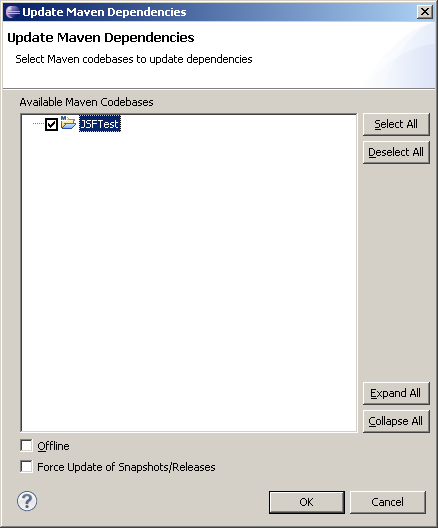
Now the Java version of our project will be changed:
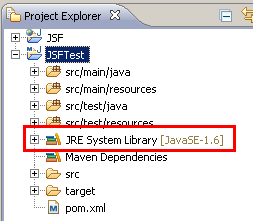
If Eclipse found a JRE and used it by default (see the warning message above), you should now create a JDK configuration: in "Preferences" => "Java"
=> "Installed JREs" add a new one which points to a JDK:

And in "Preferences" => "Java" => "Installed JREs" => "Excecution Environments", select "JavaSE-1.6" and check the JDK instead of the JRE:

The project will reference the new JDK now.
Step 2: Repositories
Now we add some JBoss repositories. The following list is taken from the "gettingstarted" example (see above).
For more information about JBoss repositories, see here: http://community.jboss.org/wiki/MavenGettingStarted-Users
	<repositories>
		<repository>
			<id>jboss-public-repository-group</id>
			<name>JBoss Public Maven Repository Group</name>
			<url>https://repository.jboss.org/nexus/content/groups/public</url>
			<layout>default</layout>
			<releases>
				<enabled>true</enabled>
				<updatePolicy>never</updatePolicy>
			</releases>
			<snapshots>
				<enabled>true</enabled>
				<updatePolicy>never</updatePolicy>
			</snapshots>
		</repository>
		<!-- Deprecated Repository -->
		<repository>
			<id>jboss-deprecated-repository-group</id>
			<name>JBoss Deprecated Maven Repository Group</name>
			<url>https://repository.jboss.org/nexus/content/repositories/deprecated/</url>
			<releases>
				<enabled>true</enabled>
				<updatePolicy>never</updatePolicy>
			</releases>
			<snapshots>
				<enabled>true</enabled>
				<updatePolicy>never</updatePolicy>
			</snapshots>
		</repository>
	</repositories>
	<pluginRepositories>
		<pluginRepository>
			<id>jboss-public-repository-group</id>
			<name>JBoss Public Maven Repository Group</name>
			<url>https://repository.jboss.org/nexus/content/repositories/releases/</url>
			<layout>default</layout>
			<releases>
				<enabled>true</enabled>
				<updatePolicy>never</updatePolicy>
			</releases>
			<snapshots>
				<enabled>false</enabled>
				<updatePolicy>never</updatePolicy>
			</snapshots>
		</pluginRepository>
	</pluginRepositories>
Step 3: Dependencies and Profile
We now have to declare the dependencies for JSFUnit.
First part is the JSFUnit-Framework:
	<properties>
		<version.jsfunit>2.0.0-SNAPSHOT</version.jsfunit>
		<version.arquillian>1.0.0.Alpha5</version.arquillian>
	</properties>

	...

	<dependencies>
		<dependency>
			<groupId>javax.enterprise</groupId>
			<artifactId>cdi-api</artifactId>
			<version>1.0-SP1</version>
			<scope>provided</scope>
		</dependency>

		<dependency>
			<groupId>junit</groupId>
			<artifactId>junit</artifactId>
			<version>4.8.1</version>
			<scope>test</scope>
		</dependency>

		<dependency>
			<groupId>org.jboss.arquillian</groupId>
			<artifactId>arquillian-junit</artifactId>
			<version>${version.arquillian}</version>
			<scope>test</scope>
		</dependency>

		<dependency>
			<groupId>com.sun.faces</groupId>
			<artifactId>jsf-api</artifactId>
			<version>2.0.4-b03</version>
			<scope>provided</scope>
		</dependency>

		<dependency>
			<groupId>jboss.web</groupId>
			<artifactId>servlet-api</artifactId>
			<version>3.0.0-beta-2</version>
			<scope>provided</scope>
		</dependency>


		<dependency>
			<groupId>org.jboss.jsfunit</groupId>
			<artifactId>jsfunit-arquillian</artifactId>
			<version>${version.jsfunit}</version>
			<scope>test</scope>
		</dependency>

	</dependencies>
Note that the versions of JSFUnit and Arquillian are declared as properties, so that an update is easily possible.
After saving the file, the dependencies are refreshed and you should see them in "Project Explorer". The path after each entry is the path in
your local Maven repository:
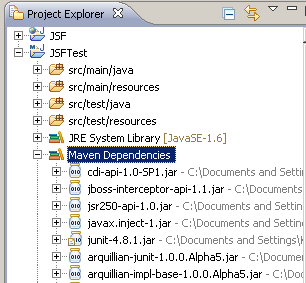
The GUI editor for "pom.xml" provides the ability to browse a repository for available artifacts. But this does not work for the JBoss repos -
probably because they don't provide a "Nexus index" file.
Next we add a "Profile": when you want to run your tests against multiple containers, you need a profile for each container, which bundles the container
specific dependencies. You also need a profile when running just a single container, because Arquillian will fail otherwise.
	<profiles>

		<profile>
			<id>arq-jbossas-remote</id>
			<dependencies>
				<dependency>
					<groupId>org.jboss.arquillian.container</groupId>
					<artifactId>arquillian-jbossas-remote-6</artifactId>
					<version>${version.arquillian}</version>
					<scope>test</scope>
				</dependency>

				<dependency>
					<groupId>org.jboss.jbossas</groupId>
					<artifactId>jboss-as-profileservice-client</artifactId>
					<version>6.0.0.Final</version>
					<type>pom</type>
					<scope>test</scope>
				</dependency>
				<!-- jboss-deployers-client-spi provides deployment exception class -->
				<dependency>
					<groupId>org.jboss.deployers</groupId>
					<artifactId>jboss-deployers-client-spi</artifactId>
					<version>2.2.0.GA</version>
					<scope>test</scope>
				</dependency>
			</dependencies>
		</profile>
	</profiles>
Note that some dependencies differ from the "Getting Started" sample. The reason is this page:
http://community.jboss.org/en/arquillian/blog/2011/04/05/trim-your-dependencies-when-using-jboss-as-6-remote.
According to a comment on this page, "jboss-as-profileservice-client" is not the only requirement, also "jboss-deployers-client-spi" is required.
That's all, now we are ready to code our first test ;-).
Version 2 - First Test: creating deployable file
Before starting with the coding, we first have to make the "JSFTest" project reference the "JSF" dynamic web project, because we need some utility classes from this project:
In the properties of the project "JSFTest", go to the "Build Path" and add a "Projects" reference:
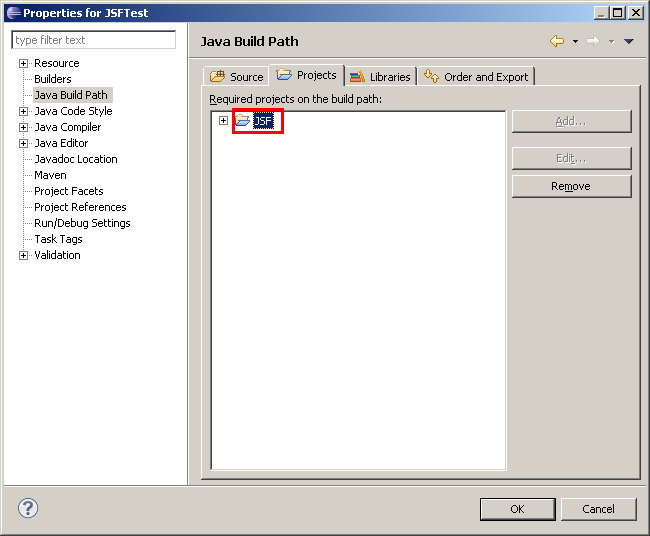
Important:
Whenever you save "pom.xml" and thus update the project configuration, you have to re-add this reference!
Note:
This project reference will probably not work when trying to start the tests by using the Eclipse integrated JUnit test runner, but it will be good
enough for the beginning.
Now, we add the test class "de.fhw.komponentenarchitekturen.knauf.jsf.tests.GeometricModelTest" in the source directory "src\test\java" (NOT in "src\main\java").
The class header will look like this:
@RunWith(Arquillian.class)
public class GeometricModelTest
{
  ...
First step in this test is to create a deployable archive which basically has the same content as a WAR file which would be deployed by Eclipse.
The Arquillian framework will deploy this archive to a remote (local running) JBoss.
So we add a static method "createDeployment" and annotate it with @org.jboss.arquillian.api.Deployment:
  @Deployment
  public static WebArchive createDeployment()
  {
    WebArchive war = ShrinkWrap.create(WebArchive.class, "JSF.war");

    war.setWebXML(new File("../JSF/WebContent/WEB-INF/web.xml"));
    war.addPackage("de.fhw.komponentenarchitekturen.knauf.jsf"); //will add the "GeometricModelTest" class itself, though it is in a sub package.

    war.addAsWebResource(new File("../JSF/WebContent/", "index.jsp"));
    war.addAsWebResource(new File("../JSF/WebContent/", "geometricmodel.jsp"));

    war.addAsWebInfResource(new File("../JSF/WebContent/WEB-INF/faces-config.xml"), "faces-config.xml");

    war.addAsWebInfResource(EmptyAsset.INSTANCE, "beans.xml");

    war.addAsLibrary(new File("../JSF/WebContent/WEB-INF/lib/jstl.jar"));

    System.out.println(war.toString(true));

    return war;
  }
Here is some tricky code: we pick all the files from the the "JSF" project (web.xml, JSPs, faces-config.xml, classes, libraries). Thus we need relative paths here.
We create a "WebArchive", using the "ShrinkWrap" API. Note that the war file name defines the default context root (if no different context root is declared),
so it must be identical to the name which is used to access the app later.
- "web.xml" is put in the archive by using the method "setWebXML".
- All class files are added by using "addPackage" or "addClass". In my sample I add the package "de.fhw.komponentenarchitekturen.knauf.jsf": this
contains the classes from my "JSF" project, and also the classes in the subpackage ".tests".
But error detection for missing classes will be easier if you don't add a full package, but single classes:
war.addClasses(GeometricModelHandler.class, Historie.class, Seitenlaengen.class, GeometricModelTest.class);
This way, you will see an error message when you take some classes from a different project and this project reference is lost.
- All JSP files are added by using "addAsWebResource"
- "faces-config.xml" must be added using "addAsWebInfResource": this method adds files to "WEB-INF".
- An empty "beans.xml" is added - as far as I know this is required for CDI ("Context and Dependency Injection"). The snippet is taken from the "Getting Started"
sample, I don't know in how far it is required. For more details see here:
http://community.jboss.org/wiki/InjectionCDIForJSFSessionJSFClientSessionAndJSFServerSession
- JAR files are added to WEB-INF/lib by using "addAsLibrary". Note that in my sample (with the split projects), I had to use the overload with a "java.io.File" parameter
- the overload with a "string" parameter did not find the JAR file.
- For debugging purposes, a "war.toString(true)" is very helpful - it outputs a full list of all files in the archive.
There will be one problem: the "ShrinkWrap" API cannot find the classes from the "JSF" Dynamic Web Project, because Maven does not use/know the Eclipse classpath.
But another trick will help: We use the "Build Helper Maven Plugin": http://mojo.codehaus.org/build-helper-maven-plugin/usage.html
This plugins allows adding of further source directories to a Maven project. The "pom.xml" snippet for our project looks like this:
	<build>
		<plugins>
			...
			<plugin>
				<groupId>org.codehaus.mojo</groupId>
				<artifactId>build-helper-maven-plugin</artifactId>
				<version>1.7</version>
				<executions>
					<execution>
						<id>add-source</id>
						<phase>generate-sources</phase>
						<goals>
							<goal>add-source</goal>
						</goals>
						<configuration>
							<sources>
								<source>${basedir}/../JSF/src</source>
							</sources>
						</configuration>
					</execution>
				</executions>
			</plugin>
		</plugins>
	</build>
Note:
When using M2Eclipse 1.0.0, I saw this warning after adding the "build-helper-maven-plugin" configuration:
Plugin execution not covered by lifecycle configuration: org.codehaus.mojo:build-helper-maven-plugin:1.7:add-source
(execution: add-source, phase: generate-sources)
I found a workaround here:
http://stackoverflow.com/questions/6352208/how-to-solve-plugin-execution-not-covered-by-lifecycle-configuration-for-spring
and here:
http://wiki.eclipse.org/M2E_plugin_execution_not_covered#execute_plugin_goal
	<build>
		...
		<pluginManagement>
			<plugins>
				<plugin>
					<groupId>org.eclipse.m2e</groupId>
					<artifactId>lifecycle-mapping</artifactId>
					<version>1.0.0</version>
					<configuration>
						<lifecycleMappingMetadata>
							<pluginExecutions>
								<pluginExecution>
									<pluginExecutionFilter>
										<groupId>org.codehaus.mojo</groupId>
										<artifactId>build-helper-maven-plugin</artifactId>
										<versionRange>[1.6,)</versionRange>
										<goals>
											<goal>add-source</goal>
										</goals>
									</pluginExecutionFilter>
									<action>
										<execute></execute>
									</action>
								</pluginExecution>
							</pluginExecutions>
						</lifecycleMappingMetadata>
					</configuration>
				</plugin>
			</plugins>
		</pluginManagement>
	</build>
Version 2 - First Test: test code
The code of the test is identical to version 1, so please take at look at the corresponding chapter.
Version 2 - First Test: run, Forrest, run!
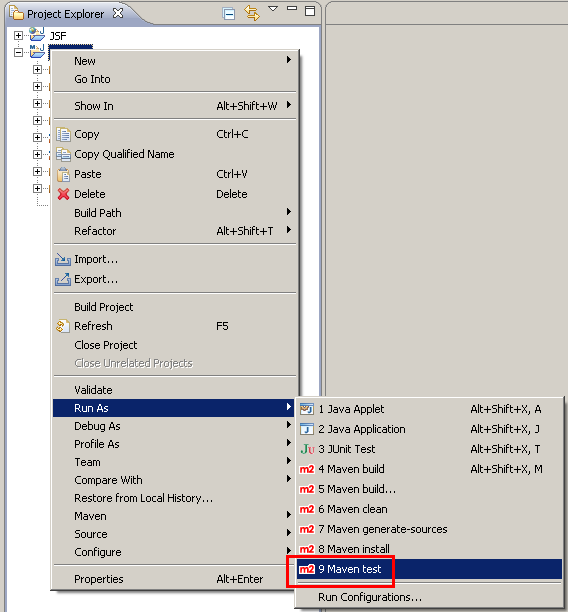
So let's start our test: in the "Run as" contextmenu of the project, select "9 Maven test":
Now you will see the output of the test in a "Maven console" window. If everything works fine, you will also see server output: the war file "JSF.war" will
be deployed, and all "System.out.println" in the test will be output on the server console.
Test results (or exceptions) can be found here:

The "txt" file is the human readable part, the "xml" file can be used to show results in the "JUnit results" view.
The tests can be started by using Maven and the command line. See above for the command line.
Version 2 - Run the Test by using the Eclipse JUnit framework
This method to run the test will cause some problems, but it will have one big benefit: debugging ;-)!
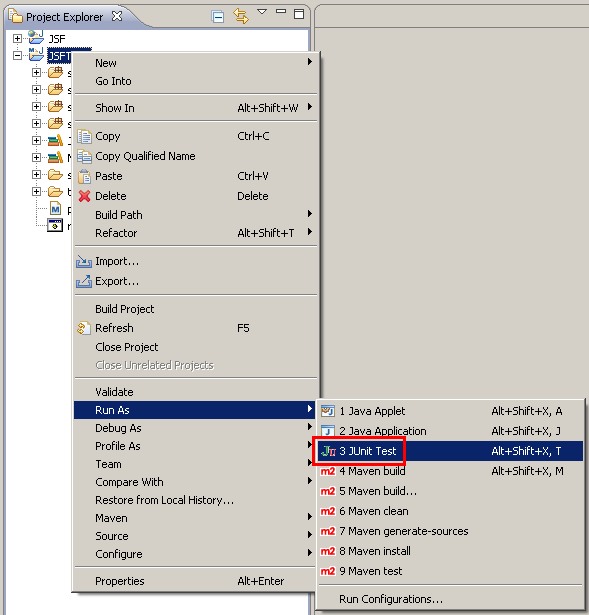
Using the Eclipse JUnit framework is simple: select the project, contextmenu "Run as" => "JUnit test":
But for me, this resulted in a nasty error Cannot run program "...\javaw.exe" (in directory "...\JSFTest"): CreateProcess error=87, Wrong Parameter:
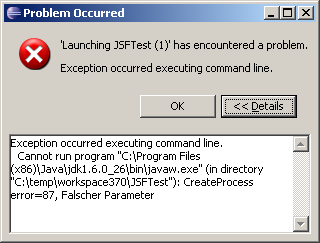
The reason seems to be that the command line (to be more specific: the classpath) is too long. I assume that not the Maven dependencies from the current
project cause this error, but Eclipse is including also all references from the referenced Dynamic Web Project "JSF", too - and this is a full JBoss server.
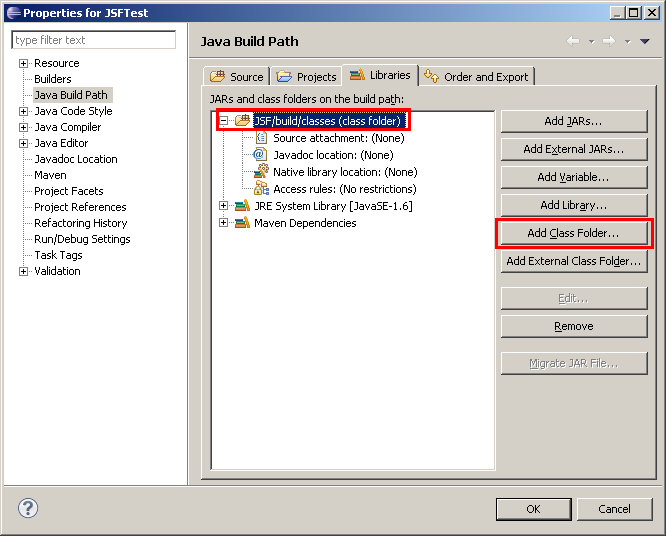
To work around this, we have to change the "Build path": instead of including the full project, we just include the "classes" directory.
In the tab "Libraries", we click "Add Class Folder" and select "JSF/build/classes". The result should look like this:
We will see this directory also in our "Project explorer", but hopefully it won't hurt:
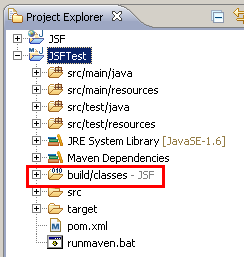
Now the tests will run, and we will see the results in the "JUnit" view:

When we start the JBoss server in "Debug" mode, we can also debug our unit tests!
Only a small problem is left: when I hit a breakpoint in the Dynamic Web Project "JSF", I saw an error message "Source not found". To resolve it:
click on "Edit Source Lookup Path". In the next dialog, click "Add...", then choose "Java Project" and click "OK", and finally select the project "JSF".
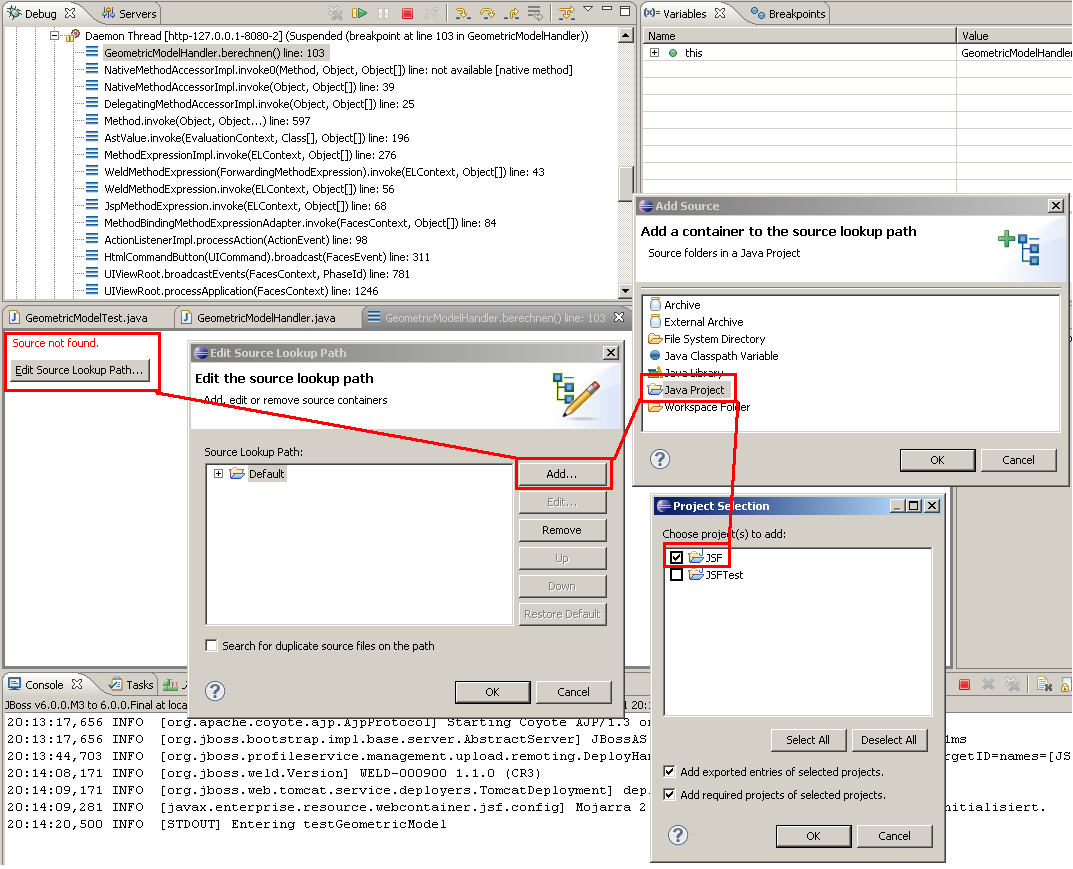
This additional source lookup path will be stored in the Run Configuration of the unit test.
Some hints
I would advice to perform a "Maven: clean" call regularly, because it might happen that Maven caches e.g. compiled classes, and because of modifications
to the project configuration they are no longer valid. To refresh the Maven data (and to delete old test reports), call "Run as" => "6 Maven clean":
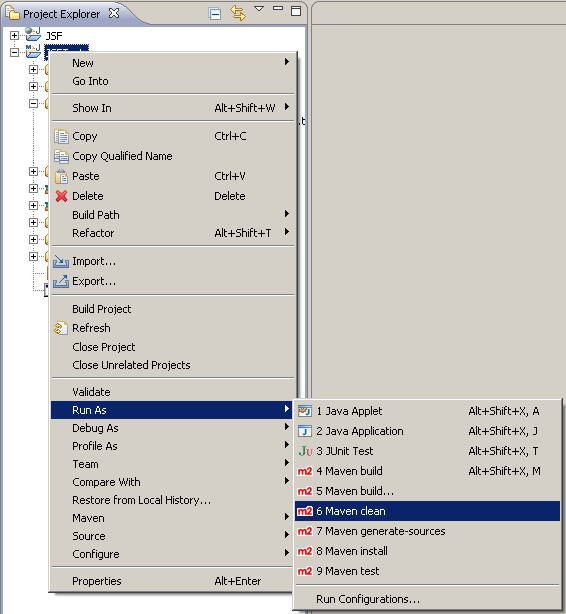
Troubleshooting
This chapter will list some errors which might happen (and which were made/seen by me ;-).
EAR file with JSF pages
This is currently not supported by JSFUnit: http://community.jboss.org/message/590634
Another problem might be the Maven archetypes: I tried to find an archetype which creates an EAR project with a bunch of module projects.
But the only I found (or better: I was pointed to) is "multi-javaee5-archetype", which can be found here:
http://code.google.com/p/open-archetypes/.
But this archetype creates a JavaEE5 application, and there is not much choice about the sub modules to create.
Error "Unable to locate the Javac Compiler"
This error will happen if you started a "Maven: test" run and reference a JRE instead of a JDK. See above (in "Step 1: java version") for the solution.
[ERROR] Failed to execute goal org.apache.maven.plugins:maven-compiler-plugin:2.3.2:testCompile (default-testCompile) on project JSFTest: Compilation failure
[ERROR] Unable to locate the Javac Compiler in:
[ERROR] C:\Program Files (x86)\Java\jre6\..\lib\tools.jar
[ERROR] Please ensure you are using JDK 1.4 or above and
[ERROR] not a JRE (the com.sun.tools.javac.Main class is required).
[ERROR] In most cases you can change the location of your Java
[ERROR] installation by setting the JAVA_HOME environment variable.
Error when running the tests
-------------------------------------------------------------------------------
Test set: de.fhw.komponentenarchitekturen.knauf.jsf.GeometricModelTest
-------------------------------------------------------------------------------
Tests run: 2, Failures: 0, Errors: 2, Skipped: 0, Time elapsed: 0.281 sec <<< FAILURE!
de.fhw.komponentenarchitekturen.knauf.jsf.GeometricModelTest  Time elapsed: 0 sec  <<< ERROR!
org.jboss.arquillian.impl.client.deployment.ValidationException: DeploymentScenario contains targets not maching any defined Container in the registry. _DEFAULT_
	at org.jboss.arquillian.impl.client.deployment.DeploymentGenerator.validate(DeploymentGenerator.java:95)
	at org.jboss.arquillian.impl.client.deployment.DeploymentGenerator.generateDeployment(DeploymentGenerator.java:77)
	at sun.reflect.NativeMethodAccessorImpl.invoke0(Native Method)
	at sun.reflect.NativeMethodAccessorImpl.invoke(NativeMethodAccessorImpl.java:39)
	at sun.reflect.DelegatingMethodAccessorImpl.invoke(DelegatingMethodAccessorImpl.java:25)
	at java.lang.reflect.Method.invoke(Method.java:597)
	at org.jboss.arquillian.impl.core.ObserverImpl.invoke(ObserverImpl.java:90)
	....
	at org.apache.maven.surefire.booter.SurefireStarter.invokeProvider(SurefireStarter.java:145)
	at org.apache.maven.surefire.booter.SurefireStarter.runSuitesInProcess(SurefireStarter.java:87)
	at org.apache.maven.surefire.booter.ForkedBooter.main(ForkedBooter.java:69)

de.fhw.komponentenarchitekturen.knauf.jsf.GeometricModelTest  Time elapsed: 0 sec  <<< ERROR!
java.lang.NullPointerException
	at org.jboss.arquillian.impl.client.container.ContainerDeployController.forEachManagedDeployment(ContainerDeployController.java:204)
	at org.jboss.arquillian.impl.client.container.ContainerDeployController.undeployManaged(ContainerDeployController.java:99)
	at sun.reflect.NativeMethodAccessorImpl.invoke0(Native Method)
	at sun.reflect.NativeMethodAccessorImpl.invoke(NativeMethodAccessorImpl.java:39)
	at sun.reflect.DelegatingMethodAccessorImpl.invoke(DelegatingMethodAccessorImpl.java:25)
	at java.lang.reflect.Method.invoke(Method.java:597)
	at org.jboss.arquillian.impl.core.ObserverImpl.invoke(ObserverImpl.java:90)
	at org.jboss.arquillian.impl.core.EventContextImpl.invokeObservers(EventContextImpl.java:98)
	at org.jboss.arquillian.impl.core.EventContextImpl.proceed(EventContextImpl.java:80)
	at org.jboss.arquillian.impl.core.ManagerImpl.fire(ManagerImpl.java:126)
	at org.jboss.arquillian.impl.core.ManagerImpl.fire(ManagerImpl.java:106)
	at org.jboss.arquillian.impl.core.EventImpl.fire(EventImpl.java:67)
	at org.jboss.arquillian.impl.client.ContainerEventController.execute(ContainerEventController.java:74)
	...
	at org.apache.maven.surefire.booter.SurefireStarter.invokeProvider(SurefireStarter.java:145)
	at org.apache.maven.surefire.booter.SurefireStarter.runSuitesInProcess(SurefireStarter.java:87)
	at org.apache.maven.surefire.booter.ForkedBooter.main(ForkedBooter.java:69)
This simply means that you don't have specified a profile in the M2Eclipse project properties (see the the end of chapter Version 1 - First Test: test code),
or you missed the "-P" command line argument in the Maven call.
Last modified 2019-02-11
History:
2011-08-11: created
2011-09-09: added another version of the sample, which is based on the "M2E-WTP" plugin and a JavaEE6 archetype.
2015-11-11: the end of JSFUnit
2016-02-14: the end of Arquillian Warp?
2019-02-11: link to sample using Arquillian Warp


