| |
XML PARSING WITH DOM IN C++
XML Parsing in 10 steps - Part I
This
tutorial is intended for C/C++ developers interested in writing XML
applications using the DOM APIs as implemented in Microsoft.
XML
Core Services (MSXML). It contains a very simple tutorial with some
really simple functionality to help you get started off in using the
msxml parser.
This implementation is purely a beginner's tutorial in DOM, and as such will not always be optimized.
This
tutorial has been prepared by me, after learning about this technology
from other tutorials on the net, hence I do not claim that this work is
entirely mine, and to support this I have included all the references
that I have used in the creation of this tutorial. What I have strived
to achieve is to bring together all the bits of functionality that I
found in all the different tutorials.
What do I need for this tutorial?
- Visual studio 6.0
- msxml.dll
(you can search for it using the windows start->search command). It
can usually be found in the windows System32 directory. If necessary,
you can get a free download of MSXML 4.0 from MSDN.
The XML Document Object Model
Is
a very powerful and robust programmatic interface that enables you to
programatically load and parse an XML file and also traverse the XML
data.
You can even use objects in the DOM to save the changes back to a file.
In this short tutorial we will be looking at using the DOM to load an XML document and to iterate through its elements.
I will not be showing you the steps to create a sample mfc project using the appWizard.
Hence, at this stage I am assuming that you have been able to successfully create a sample mfc project.
Now we shall progress through the task of adding xml parsing support into the application.
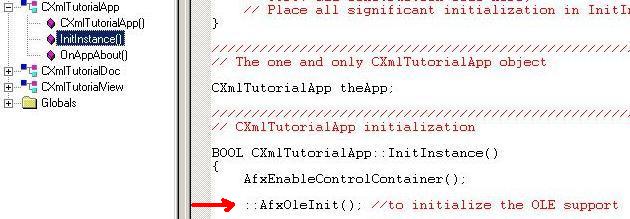
Step1: Add a call to initialize OLE support
In the workspace access the applications::InitInstance() function.
and add the following code:
::AfxOleInit(); //to initialize the OLE support
Step 2: Import the Microsoft XML Parser typelib (OLE type library). One of the easiest ways of doing this is as follows:
Open the program's stdAfx.h file
Just before the #endif directive, add the following
#import <msxml.dll> named_guids
using namespace MSXML;

Now,
how you implement the DOM object in your implementations is completely
dependent on the situation there. It could be as a local variable, in a
class or using any other mechanism. In this example, I shall create a
dialog box and conduct all the DOM based activity there so that we can
cluster all the DOM based code in one section for the sake of brevity.
Another advantage is that I can display the xml file we load in a tree structure inside the dialog box.
Step 3: Let us go ahead and create a modal dialog box for this purpose using the following procedure.
Click on the "Resource" Tab, right click on "Dialog" and click "Insert Dialog", and edit the dialog ID to IDD_DIALOG_XML.
In the dialog box, create a Tree control and edit its ID to be IDC_TREE_XML.
Add the following buttons:
Button 1 --> Text: Initialize DOM, the ID: IDC_BUTTON_INITIALIZE
Button 2 --> Text: Load XML File, the ID: IDC_BUTTON_LOADFILE
Step
4: Now lets create a class for the dialog we just created, and name the
class as CXMLDialog, derived from CDialog and ensure that the ID
matches the dialog we created. (It should by default).

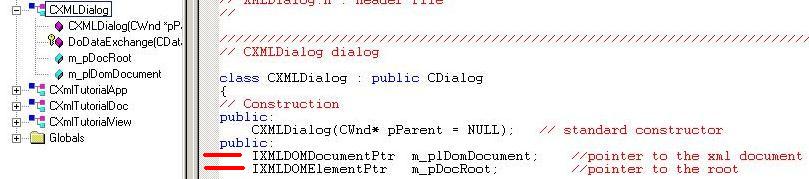
Step 5: Declare the DOM variables we need in the dialog class as follows:
Click on the "class tab" and double click on the dialogClass "CXMLDialog" to access the class definition.
Add the following code in the definition to declare the DOM variables as public variables.
IXMLDOMDocumentPtr m_plDomDocument; //pointer to the xml document
IXMLDOMElementPtr m_pDocRoot; //pointer to the root
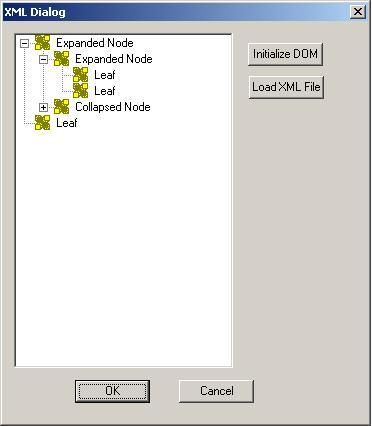
Step 6: Creating the required controls in the dialog Box
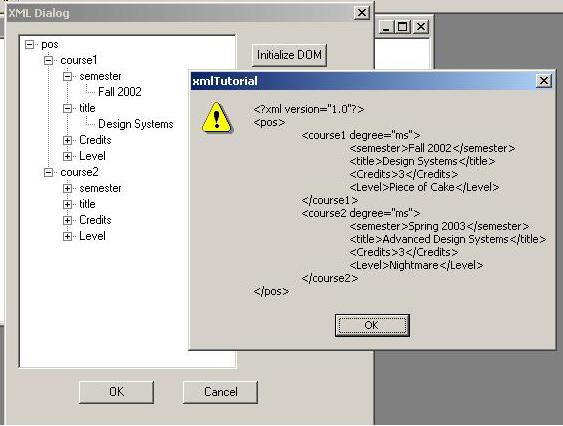
Please
look at the image of the dialog box and create the required buttons and
tree control and its associated variables and "onbutton" functions.
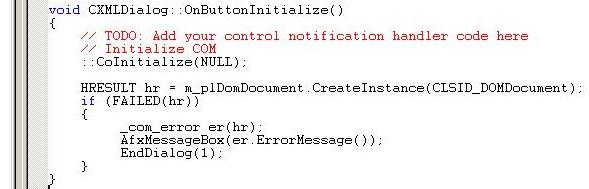
Step 7: Initialize the COM Runtime and set up the XML document Smart Pointer.
The Com Runtime can be initialized anywhere where the DOM variables you declared can be accessed.
Now in the case of the dialog box it could be on InitDialog() or based on some event.
In our tutorial lets do it when the "Initialize DOM" button is pressed.
Proceed to access the function that is called when the load DOM button is pressed
and enter the following code:
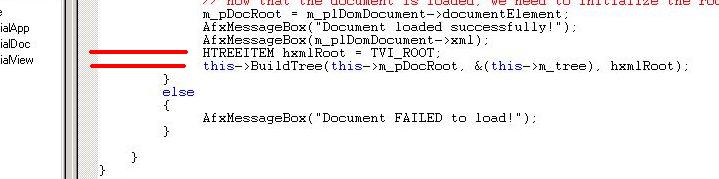
Step 8: Loading the XML file into the DOM
We can either hard code the path of the xml file that needs to be accessed
or have a windows file dialog control assist you.
So in this tutorial, we will create a Windows File Dialog assist you.
In
order to open the Windows File Dialog, lets access the function that is
called when "Load XML file" button is pressed, and enter the following
code:

Essentially
what this does is that it helps you to locate your xml file through the
familiar windows file dialog and then it loads the contents of the XML
file into a tree structure in the DOM and then displays the entire file
to you in a afxMessageBox. There has been error handling included to
deal with undesirable situations.
Step 9: Loading the XML into the tree control in the dialog
For
this implementation, essentially we should be in a position to traverse
through the tree structure in the DOM, and replicate that in the dialog
box by entering data in the tree control.
Hence, we shall create 2 member functions in the dialog class that will do this for us.

The
need for the "InsertNode(...)" function is that even the node values
are entered as nodes, nodal values, text and attributes are considered
as nodes, and hence to differentiate them, we use the conditions.
It is true that it could have been included in "BuildTree(...)" but I decided to seperate them for the sake of brevity.
Step 10: Tying up the loose ends.
Okay,
now we go ahead and create a menu item that can display the class, for
example, a command in the view menu which will instantiate an object of
the XMLDialog class.
Then display the dialog box with a doModal() function.
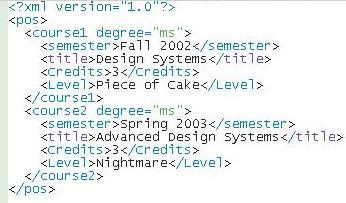
Create a test xml file, for example:
Go back to the function that helps us load the xml file into the DOM.
Then after the file has been successfully loaded, lets load it into the tree control with this command:
CONCLUSION
- This
the part 1 of a very simple tutorial for DOM -XML parsing. Part 11 will
handle issues like adding nodes, deleting, editing values etc.
- Its
a beginner level tutorial and I have not concerned myself with memory
allocation and freeing issues, so this is not optimized codes.
- For more information please go through the references I have mentioned.
- This is my first tutorial so please bear with any omissions or mistakes, but feedback for my part 2 will be welcome.
REFERENCES
1. Tom Archer's article on XML Parsing with DOM - my main reference.
2. Program with DOM in C/C++
3. XML Beginner's Guide
4. Using the MSXML Parser to Work with XML Documents
5. MSXML 3.0 SDK
6. XML tutorials in codeguru.
7. Title: Build XML using MSXML parser, blank namespace added to child nodes
8. A good free xml editor
9. Microsoft's free xml editor
|
|